From #GivingTuesday to the end of the giving season, it will be critical for fundraisers to keep close track of progress toward their fundraising goals. For those with Salesforce, you can facilitate that by scheduling a report on that progress so it is emailed to key staff daily. This step-by-step recipe will walk through the creation of a fundraising report and how to schedule its delivery.
For other last minute #GivingTuesday tips, watch our webinar, #GivingTuesday Fundraising for Procrastinators.

Objective
Create a custom Report in the Salesforce Nonprofit Success Pack that shows gifts from new donors vs. previous donors during this year's giving season and emails it to key staff once a day
Estimated Time
20 - 30 minutes
Requirements
- Salesforce Nonprofit Success Pack
- Use of the Donations (aka Opportunities) objects to track donations
- Rudimentary familiarity with creating custom fields and Reports in Salesforce
- Is First Gift Ever custom field outlined in Step One of Chart New Donor Acquisition Cumulatively by Month during the Last 5 Years Salesforce how-to recipe
Desired Outcomes
- Chart gifts from new donors vs. previous donors during this year's giving season which will be defined as starting with #GivingTuesday and concluding December 31st
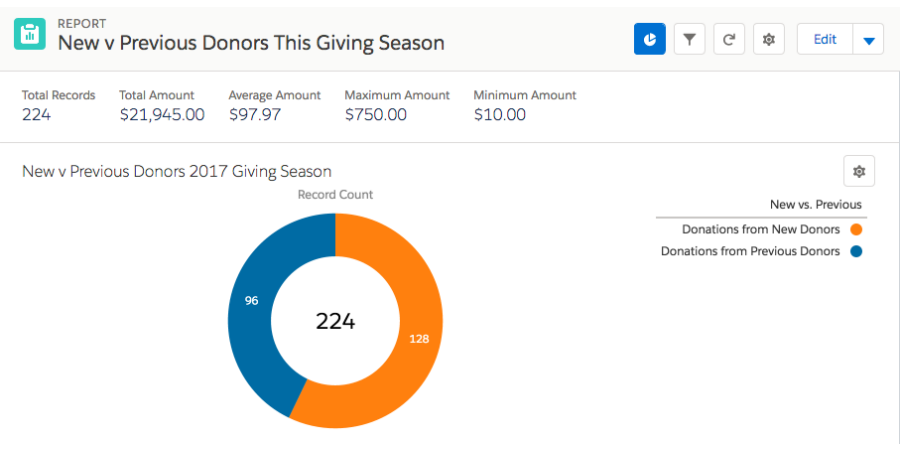
- Calculate the average gift amount, largest gift amount, smallest gift amount, and total gifts for gifts during last year's giving season and aggregate by new donors and previous donors
- Schedule the report to be emailed to key staff once a day
The End Result
To create the above chart and its custom Report, we'll be following the exact same steps as outlined in our how-to recipe Calculate Giving from New Donors vs. Previous Donors Last Giving Season in the Salesforce Nonprofit Success Pack. If you have already created that Report, you can make a copy of it and adjust the Date filter to be from 11/28/2017 - 12/31/2017. You'll also want to make sure that you update the references to "last year" and 2016 to "this year" and 2017. Once done, you can skip to Step Four in this how-to recipe.
To build this custom report on Opportunities from scratch, follow all of the steps in this how-to recipe. It will allow you to show the above chart with its breakdown of gifts by new donors vs. previous donors during this year's giving season, where "new donor" is defined as someone who gave for the first time ever during that holiday giving season. Totals, averages, minimums and maximums are shown for all donations during this year's end-of-year giving season at the top of the chart with the Report having these metrics for new vs. previous donors.

Step One: Create a custom Report
With our Is First Gift Ever custom Opportunity field created in this earlier recipe, we can create our Report:
- Go to the Reports tab
- Click New Report
- For Select Report Type, choose Opportunities
- Click Create
- For Show, confirm "All Opportunities" is selected
- For Date Field > Range, select "Custom"
- For From, enter 11/28/2017 which is #GivingTuesday this year. This date can be updated for future year's reporting.
- For To, enter 12/31/2017
- Click Filter > Add
- In the new Filter form that appears:
- Next, choose "Won" from the field drop down
- Select "equals" for the operator
- Enter "true" in the text field
- Click OK
- Click Save and enter in the following values in the popup window and click Save:
- Report Name: New v Previous Donors This Giving Season
- Report Unique Name: New_v_Previous_Donors_This_Giving_Season
- Report Description: Donations from New v Previous Donors During This Giving Season
- For Report Folder, select the folder of your choice
- Click Save
Step Two: Change your Report to a Summary Report and Create a Bucket
- Next to the Preview header, click Tabular Format and select Summary
- In the Fields left column, double-click Add Bucket Field
- In the popup for Source Column, select Is First Gift Ever
- For Bucket Name Field, enter "New vs. Previous" without the quotes
- In the search field to the right, enter "true" without the quotes and click Search
- Tick the checkbox for "True" in the results view
- Click the down arrow next to Move To
- For the Create New Bucket field, enter "Donations from New Donors" without the quotes
- Click Enter
- In the search field to the right, enter "false" without the quotes and click Search
- Tick the checkbox for "True" in the results view
- Click the down arrow next to Move To
- For the Create New Bucket field, enter "Donations from Previous Donors" without the quotes
- Click Enter
- Drag and drop your new New vs. Previous bucket field where it says "Drop a field here to create a grouping."
- Hover over the Amount column heading and click the down arrow
- Click Summarize this field...
- Tick off all of the summary options
- Click Apply
- Save your report
Step Three: Modify the Report's chart
To create the chart noted above in Lightning, edit the default chart as follows:
- Display As: Donut Chart
- Chart Title: New v Previous Donors 2017 Giving Season
- Label Groups: Values
- Cumulative: check
- Add: Group
- Save your Report
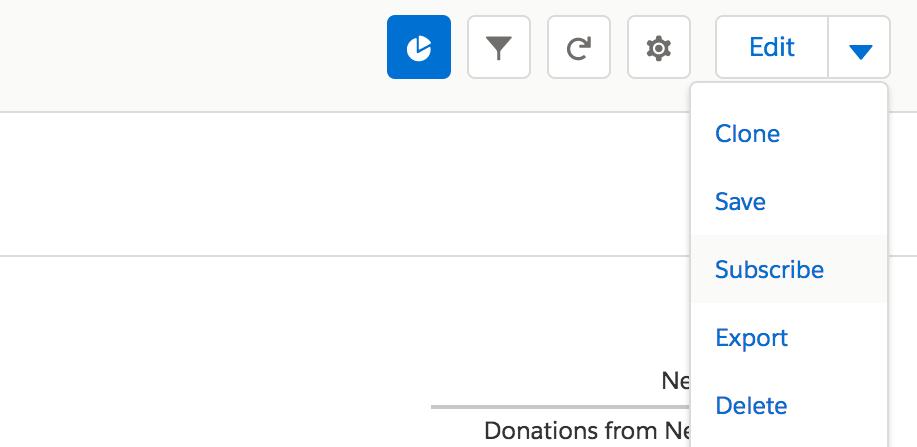
Step Four: Schedule the Report to email to you and other staff
Now we can schedule our report to be sent to ourselves and other Salesforce users. The process is different depending on which Salesforce user interface you use so we'll tackle them both separately.
For those using Salesforce Lightning, run the report and click the drop down arrow in the upper right and then click Subscribe.
In the modal popup, select the frequency and time at which you wish to start to run the report. We'd recommend Daily and first thing in the morning so you have this information right when you first begin your day. And if you find yourself faced with a time zone you weren't expecting, you can change it for your entire Salesforce org or just your user account.
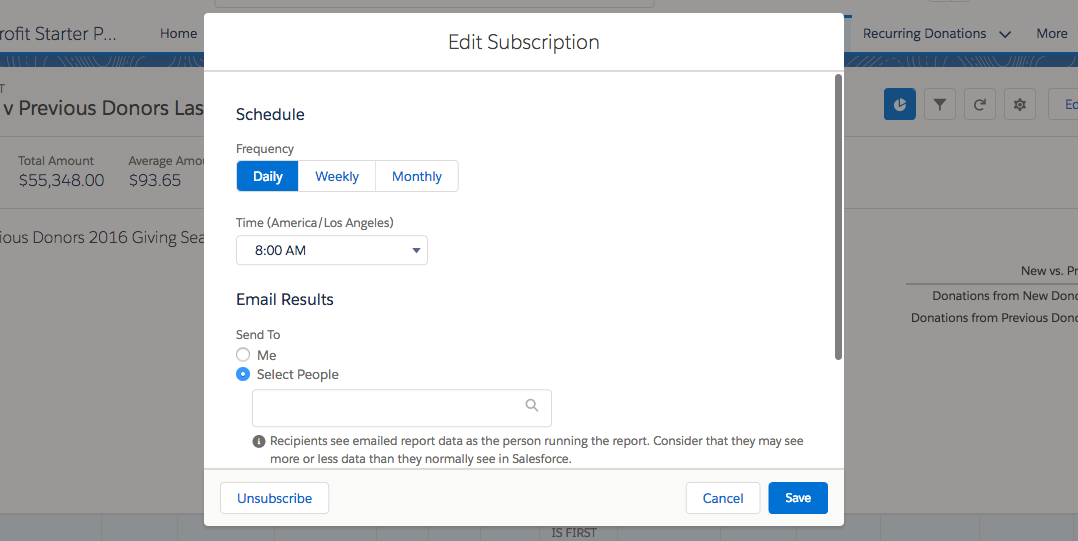
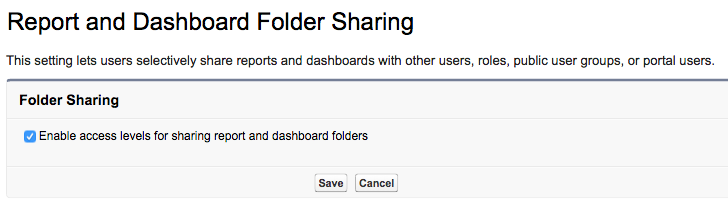
If you wish to include others but don't see that option in your modal popup, you likely need to enable access levels for sharing Report And Dashboard. This is an arcane little step that will require you to switch to Salesforce Classic for the moment. Once you've done that:
- Go to Setup
- In the Quick Find field in the left column, search for "Folder Sharing"
- Click Folder Sharing
- On the Report and Dashboard Folder Sharing page, tick the checkbox for "Enable access levels for sharing report and dashboard folders"
- Click Save
- Return to Salesforce Lightning and continue with the earlier steps
In Salesforce Classic:
- Open the Report
- Click the down arrow next to Run
- Click Schedule Future Runs...
- Select the users, frequency and time at which you wish to start to run the Report
- Set the Start date as 11/28/2017 and the End date as 12/31/2017 to run from #GivingTuesday to the end of the year. Click Save Report Schedule.
Clarification
This Report is structured such that, if a new donor during this year-end giving season donates multiple times during that giving season, their first gift will be included in the "Donations from New Donors" cohort and their subsequent gifts in the "Donations from Previous Donors" cohort.
Next Steps
For other last minute #GivingTuesday tips, watch our webinar, #GivingTuesday Fundraising for Procrastinators.
