As hard as it is to believe, #GivingTuesday is fewer than five months away. Smart nonprofits are already planning how they'll leverage this massive day of giving. A critical piece of that strategy is segmenting their donor lists so they can craft appropriate individualized appeals to donors and would-be fundraising ambassadors. One element of that segmentation is determining who gave to your organization during last year's end-of-year giving season. In this step-by-step recipe, we'll share one way to do this using User Defined Rollups in the Salesforce Nonprofit Success Pack.
For more on extending the Salesforce Nonprofit Success Pack for Giving Tuesday appeals along with savvy fundraising strategy, watch our free webinar, Seize #GivingTuesday Success with Fundraising Wisdom and Salesforce .
Objective
Create custom fields and a User-Defined Rollup in the Salesforce Nonprofit Success Pack (NPSP) to display last end-of-year giving totals on the Contact record and easily segment donor lists
Estimated Time
20 - 30 minutes
Requirements
- Salesforce Nonprofit Success Pack
- Use of the Donations (aka Opportunities) object to track donations
- Rudimentary familiarity with creating custom fields and editing page layouts in Salesforce
Desired Outcomes
- Prioritize #GivingTuesday donor engagement by displaying last end-of-year donation data on the Contact
- Facilitate more advanced reporting to segment your donor list that includes whether a Contact gave during the last end-of-year giving season. Just a few examples include:
- Filtered Last Year But Unfortunately Not This Year (LYBUNT) report that only includes those who gave during the last end-of-year giving season
- Current sustaining donors who gave during the last holiday season
- Donors with a given Lifetime Value level who gave during the last holiday season
- Donors who have given during the current year but not during the last end-of-year giving season
The End Result
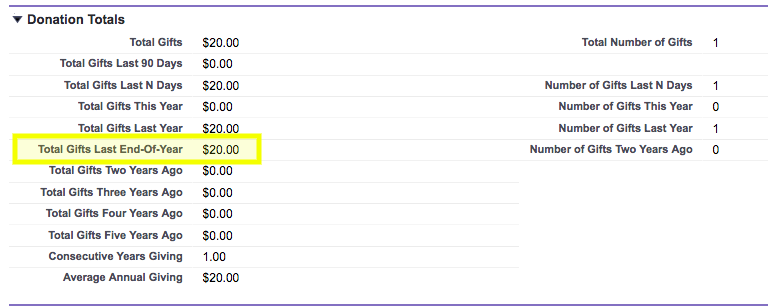
To help guide our process, the field we want to have on the Contact at the conclusion of our process is Total Gifts Last End-Of-Year which is a currency field that shows the total gifts given during that time frame.
{loadposition blog-ad-general}Step One: Create a custom field on the Opportunity object
As we've noted in previous Salesforce how to recipes, User Defined Rollups in the NPSP allow you to calculate average, total, maximum, or minimum values from date, currency, or number fields on Opportunity records, and save these values to fields on an associated Contact, Account, or Household. User Defined Rollups do not, however, allow for any filtering of Opportunity records so all Opportunities associated with a given Contact, Account, or Household that have populated values on the field in question are included, regardless of Record Type.
We're only interested in Opportunities that were Closed Won (aka, Posted) during the previous year's end-of-year giving season. To use this field year over year, we'll define the end-of-year giving season as the first possible date #GivingTuesday may occur. When is that? Five days after the earliest possible date Thanksgiving might fall which is November 22nd, making November 27th the start of our end-of-year giving season. To allow us to include only donations given between November 27th and December 31st, we'll create the formula field noted in the table below. This formula field will be blank if the date criteria aren't met, effectively excluding them from the rollup we'll create.
To create these fields in Salesforce Classic:
- Go to Setup
- In the left column, click Customize
- Click Opportunities
- Click Fields
- In the Opportunity Custom Fields & Relationships section, click New
- For each step in the process, use the values in the Opportunity Object Custom Fields charts below to create the fields
- Repeat until all fields are added
To create these fields in Salesforce Lightning:
- Go to Setup
- Enter "Object" in the Quick Find box in left column
- Select Object Manager under the Objects and Fields menu
- Scroll down the list and click Opportunities
- Click Fields
- In the Opportunity Custom Fields & Relationships section, click New
- In the Fields & Relationship section, click New
- For each step in the process, use the values in the Opportunity Object Custom Fields charts below to create the fields
- Repeat until all fields are added
Opportunity Object Custom Fields
| Elements | Field Details |
|---|---|
| Field Label: API Name: Data Type: Formula: |
Gift Amount if Last End-Of-Year Gift_Amount_if_Last_End_Of_Year__c Formula (Currency) IF ( CloseDate >= DATE ( ( YEAR(TODAY()) - 1 ), 11, 27) && CloseDate <= DATE ( ( YEAR(TODAY()) - 1 ), 12, 31) , Amount, NULL ) |
Step Two: Create a custom field on the Contact object
With our Opportunity source field created, let's create one simple currency field on the Contact object where our rollup data will go.
To create these fields in Salesforce Classic:
- Go to Setup
- In the left column, click Customize
- Click Contacts
- Click Fields
- In the Contact Custom Fields & Relationships section, click New
- For each step in the process, use the values in the Contact Object Custom Fields charts below to create the fields
- Repeat until all fields are added
To create these fields in Salesforce Lightning:
- Go to Setup
- Enter "Object" in the Quick Find box in left column
- Select Object Manager under the Objects and Fields menu
- Scroll down the list and click Contacts
- Click Fields
- In the Contact Custom Fields & Relationships section, click New
- In the Fields & Relationship section, click New
- For each step in the process, use the values in the Contact Object Custom Fields charts below to create the fields
- Repeat until all fields are added
As the finishing touch for the Contact object, edit your Contact Page Layout to create a new section called Recurring Donation Information and add the new fields there.
Contact Object Custom Field
| Elements | Field Details |
|---|---|
| Field Label: API Name: Data Type: |
Total Gifts Last End-Of-Year Total_Gifts_Last_End_Of_Year__c Currency (16, 2) |
Step Three: Create User Defined Rollups
To bring it all together, we'll create our User Defined Rollup in the NPSP. To do so:
- In the Nonprofit Success Pack app, click the NPSP Settings tab
- Click Donations
- Click User Defined Rollups
- Click New User Defined Rollup
- Use the table below, enter the appropriate values
- Click Save
- Repeat until all rollups are added
User Defined Rollups
| Opportunity Field | Rollup Operation | Target Object | Target Field |
|---|---|---|---|
| Gift Amount if Last End-Of-Year | SUM | Contact | Total Gifts Last End-Of-Year |
Step Four: Running Batch Rollups
If you'd like to see the field on the Contact object calculated immediately without waiting for the nightly batch process, you can go to the NPSP Settings tab, click on Bulk Data Processes, and run the Rollup Donations Batch. Once that is done, the Gift Amount if Last End-Of-Year field will be populated.
Alternate Approaches
Creating these fields and the User Defined Rollup allows you to easily surface and leverage this key data point of Last End-Of-Year Giving for Contacts. If you wish to limit the number of fields you're creating, you can look to create more complicated Reports to segment donors by this data as well. Or, you may wish to use the User Defined Rollup approach and push the data to the Household or Account object, if that is your desired method for segmenting your donor data.
Next Steps
For more on extending the Salesforce Nonprofit Success Pack for Giving Tuesday appeals along with savvy fundraising strategy, watch our free webinar Seize #GivingTuesday Success with Fundraising Wisdom and Salesforce .